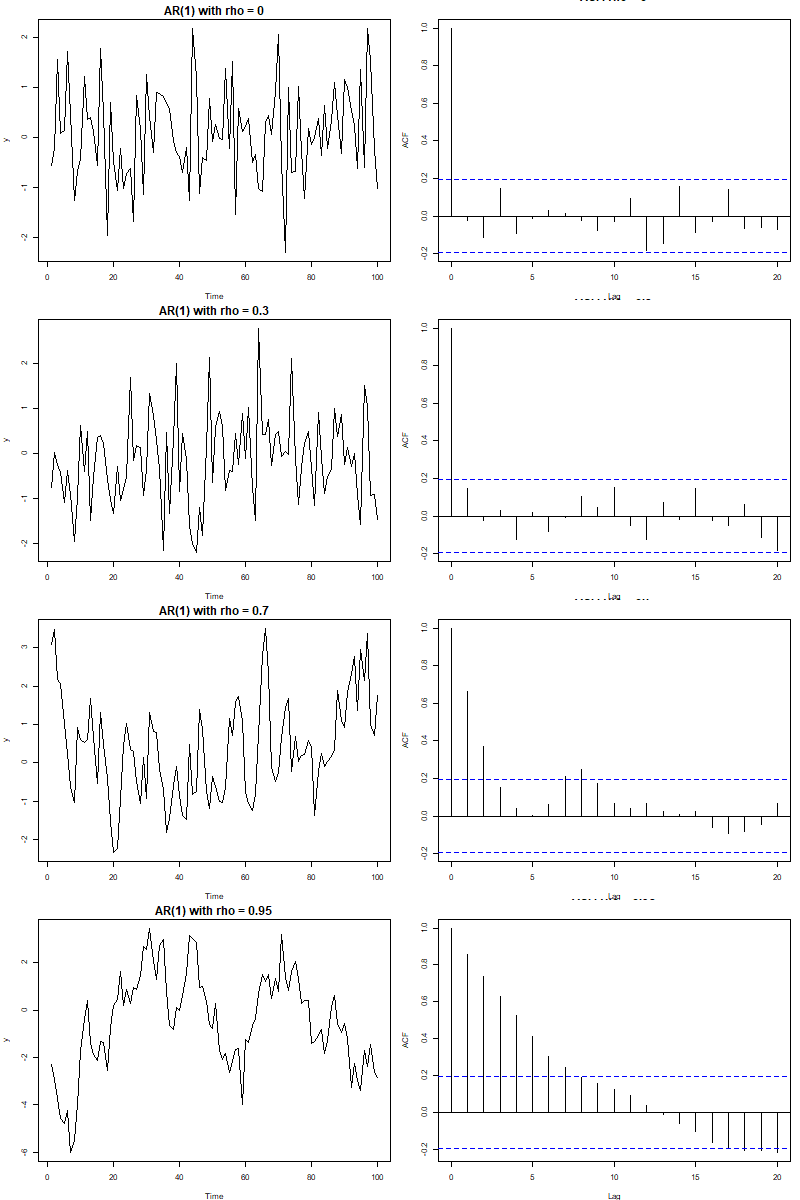
How do config R in Slurm

[TOC]

Conda environment

  • Create environment
    1
    conda create -n R4.4-syf R=4.4.1 -y
    Create R environment using 4.4.1 version.
  • Check current environments
    1
    conda env list
  • Activate & Deactivate environment
    1
    2
    3
    4
    5
    # activate
    conda activate env_name # change to env_name created before
    conda activate R4.4-syf # eg.
    # deactivate
    conda deactivate R4.4-syf
  • Delete env
    1
    conda remove -n env_name --all -y

Install jags

  1. Download and Tar
    Download package from here
    1
    2
    3
    4
    5
    6
    7
    mkdir ./JAGS-4.3.2
    tar -zxf ./jags_4.3.2.orig.tar.gz
    cd ./JAGS-4.3.2
    ./configure
    make
    make check
    make install
  2. Conda install rjags
    After tar JAGS, conda install rjags in command.
    1
    conda install -c conda forge r-rjags
  3. Install package in R
    Activate R environment using command in shell: R
    1
    2
    3
    install.packages("R2jags")
    library(rjags)
    library(R2jags)

Running R script using Shell in Slurm

The test shell script: submit_test.sh

R script: test_hpc_parallel.R

To run the R script using conda environment, the shell script:

1
2
3
4
5
6
7
module purge
module load anaconda3/2021.11
conda activate /home/224030234/R/R4.4-syf

cd /home/224030234/R
#run the application:
Rscript test_hpc_parallel.R

Following error will occur:
1
2
3
4
5
6
7
8
9
10
11
12
13
14
15
16
CommandNotFoundError: Your shell has not been properly configured to use 'conda activate'.
To initialize your shell, run

$ conda init <SHELL_NAME>

Currently supported shells are:
- bash
- fish
- tcsh
- xonsh
- zsh
- powershell

See 'conda init --help' for more information and options.

IMPORTANT: You may need to close and restart your shell after running 'conda init'.

To solve this, source conda.sh before activate, and use the full path for the R scipt.

The revised shell script:
1
2
3
4
5
6
7
module purge
module load anaconda3/2021.11
source ~/anaconda3/etc/profile.d/conda.sh
conda activate /home/224030234/R/R4.4-syf

#run the application:
Rscript /home/224030234/R/test_hpc_parallel.R

Others

  1. conda install freezing
    When install r-pkg, solving environment freezing often occurs, to solve this, replace conda install with mamba.

    What is mamba

  2. conda channels operations
    1
    2
    conda config --show channels # show current channels
    conda config --remove channels defaults # remove defaults channel
    To add new channels:
    1
    2
    3
    vim ./condarc
    # add in condarc via vim
    conda config --show channels # check channels added status

Reference

  1. infercnv安装全流程(包含jags等所有踩坑指南)
  2. conda常用命令
  3. shell脚本激活conda虚拟环境
  4. conda中如何移除默认源

Time Series analysis: AR(1) process

自回归过程

考虑是由决定,即。假设

其中,随机干扰项
序列的稳定性由决定波动程度决定。


一般地,考虑序列值可由前p个时刻的序列值表示,即

其中,;是一个p阶自回归模型AR(P), 是自回归系数。

一阶自回归过程AR(1)

一阶自回归表达式:

其中,
求方差得:

根据上得出:
对(1)两边同时乘以,并求期望得:

即:

根据独立于,且均值为0,所以,即:

将k带入求得

即:

自相关系数只与间隔(k)有关,因此是平稳(stationary)的。

模拟过程

对于不同,模拟过程并绘制自相关图(序列 自相关函数):
AR(1)模拟

代码:

1
2
3
4
5
6
7
8
9
10
11
12
13
14
15
16
17
18
19
20
21
22
23
24
set.seed(123)

simulate_AR1 <- function(rho, sigma = 1, T = 100) {
y <- numeric(T)
y[1] <- rnorm(1, 0, sigma / sqrt(1 - rho^2)) # stationarity
for (t in 2:T) {
y[t] <- rho * y[t-1] + rnorm(1, 0, sigma)
}
return(y)
}

rhos <- c(0, 0.3, 0.7, 0.95)
par(mfrow = c(4, 2), mar = c(4, 4, 2, 1), cex.main = 1.5)

for (rho in rhos) {
y <- simulate_AR1(rho)

# 时间序列图
plot(y, type = "l", main = paste("AR(1) with rho =", rho),
ylab = "y", xlab = "Time")

# 自相关图
acf(y, main = paste("ACF: rho =", rho))
}

根据上图,自相关系数越小,ACF衰减越快,相反,ACF衰减越慢。

B-Splines

Lagrange interpolation

Consider 2 points and


is a random point between and :

where and are base functions.

Consider 3 points , and


Knowing that these 3 points will get a certain quadratic function. To get this function, for every point, there is ,

The result for interpolation is:

To fit that ,

The sum for these 3 points:

Largragne interpolation


For points, , .

  • , therefore, it contains all the points
  • is the base function.

Bezier curve

Given 3 points , assume in the line :

Hence, .


Suppose there are points, the Bezier curve is:

The is determained by the former points’ ’ Bezier curve and later points :

B-Splines

Basic concepts:

  • Control points: control the shape of curves. Suppose there are control points: .
  • Knot: affect for the weight, suppose knots, the curve is devided into pieces.
  • Degree & Order: order = degree + 1, degree is usually denoted as .

where represents the -th points’ weight function.


How to get (de Boor):

B-splines regression

For multilinear regression, , where .\
For splines estimates, assume:

where is the base spline function.


For more details, see here for reference.

Reference

  1. Introduction of Lagrange interpolation.

  2. 陈广雷, 王兆军. 多元部分线性模型的B-样条估计[J]. 应用概率统计, 2010, 26(2): 138-150.

Train your Own Detection Model - YOLO

Continuing from the previous blog 1 that successfully detecting objects like cats and dogs but failing to detect Saber. This blog will apply Yolo v8 to train a model from data collection & labeling, training & validating and finally predicting the object result.

Background of Yolo

YOLO: You Only Look Once

The YOLO model (Redmon et al., 2016) is the very first attempt at building a fast real-time object detector. The main feature of YOLO algorithm is that it treats the object detection problem as a regression problem, directly predicting multiple bounding boxes and category probabilities in the image through a single network forward propagation.

Basic Concept

YOLO abandons the sliding window and directly divides the original image into SS non overlapping small squares. Then, through convolution, the SS feature map is generated, where each element of the feature map corresponds to a small square in the original image.

  1. How to identify the Object
    The training result can be viewed as a classification, and the result is . If the prediction is the same as the target then , otherwise .

  2. Determain the Border and Position
    The coordinates of bounding box are defined by a tuple of 4 values, (center x-coord, center y-coord, width, height) - . and are normalized by the image width and height, and thus all between (0, 1].

  3. Confidence Scores of Border
    Confidence scores includes two parts: probability of target included and precision of border. The former one could be represented by , and the later one is the ratio of prediction and ground truth called intersection over union (IOU).

    And the confidence scores .

  4. Included Target or Not
    For each cell, it is also necessary to provide predicted probability values for C categories, which represent the probabilities of the bounding boxes predicted by that cell belonging to each category. These probability values are actually conditional probabilities () at the confidence levels of each bounding box. The class-specific confidence scores can be calculated:

  5. Summary
    Image size: ,
    Bounding boxes numbers: ;
    In total, one image contains bounding boxes, each box corresponding to 4 location predictions, 1 confidence score, and C conditional probabilities for object classification. Every bounding box needs , so the final prediction for a image is , which is the tensor shape of the final conv layer of the model.

Network Architecture
YOLO uses convolutional networks to extract features, and then uses fully connected layers to obtain predicted values which is similar to GooLeNet.
GooLeNet
The final prediction is produced by two fully connected layers over the whole conv feature map.

Loss Function
The loss calculation of the model includes three aspects: positioning loss, classification loss, and confidence loss.

Position: 𝟙

Classification: 𝟙

Object: 𝟙𝟙

𝟙 indicates whether the j-th bounding box of the cell i is “responsible” for the object prediction.

The total loss:

(The detailed explanation for yolov5 can be found here)

Training the Model

Environment

Python: 3.8

Yolo model: cv2, yolo v8

Label: labelImg for labelling the training dataset

Dataset

Here I downloaded around 150 images from google with keywords ‘saber’ for Yolo model training. With the help of LabelImg, images had been labeled with Yolo format. After processing, each image will pair with a txt file with format: <class_id> <x_center> <y_center> <width> <height>
For example:
example

and the txt file for this image is :0 0.545000 0.332447 0.790000 0.491135

There is also a calss file to save the calssification catrgories, here I only have one target so the class only contained saber.

Training

  1. Dataset Allocation

    Allocating about 60% images to train, 20% to valid and 20% to predict, and put the label files as well. The class txt should be at the same level as above. The directory for the images and txts is:

    • Dataset
      • images
      • labels
      • class.txt
  2. Config the Yaml

    The yaml tells the location for dataset and the number of class in this model training.

    1
    2
    3
    4
    5
    6
    7
    8
    9
    train: D:/PyCharm Community Edition 2024.1.3/TechBlog/dataset/images/train  
    val: D:/PyCharm Community Edition 2024.1.3/TechBlog/dataset/images/val
    test: D:/PyCharm Community Edition 2024.1.3/TechBlog/dataset/images/test

    # number of classes
    nc: 1

    # class names
    names: ['saber']
  3. Model training

    With the downloaded yolov8n.pt, it’s time to start to train.

    1
    2
    3
    4
    5
    6
    7
    8
    from ultralytics import YOLO

    if __name__ == '__main__':
    # Load a model
    model = YOLO('yolov8n.pt') # load a pretrained model

    # Train the model
    model.train(data='./dataset/data.yaml', epochs=270, imgsz=320)

    After 270 epochs training, model for detecting ‘saber’ has been saved.

  4. Validation

    Code for valid dataset:

    1
    2
    3
    4
    5
    6
    7
    8
    from ultralytics import YOLO

    if __name__ == '__main__':
    # Load a model
    model = YOLO('D:/PyCharm Community Edition 2024.1.3/TechBlog/runs/detect/train9/weights/best.pt')

    # Validate the model
    metrics = model.val()

    And the result for this dataset:

    val_res
    If we go to the directory to see the predicted results in /val, we will find the model successfully detects all the images!
    val_pred

Resolve the Legacy issue

Now, to see how this works to solve the problem in the Blog 1. Let the model detect the input image ‘saber’ to see the result.

1
2
3
4
5
6
7
8
9
10
11
12
13
14
15
16
17
18
19
20
from PIL import Image
from ultralytics import YOLO

if __name__ == '__main__':
# load the model
model = YOLO("./runs/detect/train9/weights/best.pt")

# from PIL loading img
im1 = Image.open("saber.jpg")
results = model.predict(source=im1, save=True)

# using loop to print the position result of detected target
for result in results:
boxes = result.boxes # bounding box

for box in boxes:
# position
x_min, y_min, x_max, y_max = box.xyxy[0]
# top-left & bottom-right
print(f"Detected object at: x_min={x_min}, y_min={y_min}, x_max={x_max}, y_max={y_max}")

Time to see the result :-)
saber_detect
Good 🎉


Reference

[1] Joseph Redmon, et al. “You only look once: Unified, real-time object detection.” CVPR 2016.

[2] Szegedy, C., Liu, W., Jia, Y., Sermanet, P., Reed, S., Anguelov, D., Erhan, D., Vanhoucke, V., & Rabinovich, A. (2014). Going Deeper with Convolutions. ArXiv. https://arxiv.org/abs/1409.4842

[3] Loss function detail in Yolov5 blog

[4] YOLO code source from github

Basic intro and experiment of CV

In this blog, a simple CV process will be applied for object detection. From a basic image gradient vector, followed by image segmentation, and finally an example of object detection using VGG.

Image Gradient Vector

  • Gradient: The direction of gradient is the greatest change rate of the function, which is used to find the extremum.
  • Image Gradient Vector: Take the image as a function, gradient can be used to measure the pixel‘s change rate. Image gradient can be regarded as a two-dimensional discrete function, and image gradient is actually the derivative of this two-dimensional discrete function .

    Take the Sobel operator for an example, which mainly used for edge detection, is a discrete difference operator used to calculate the grayscale approximation of the image gradient function.

Calculation for an image .

  • Image Process Example: here using an example to see the difference between applying and to process image pixel.
    The example image is: mygo
    Code for this:
    1
    2
    3
    4
    5
    6
    7
    8
    9
    10
    11
    12
    13
    14
    15
    16
    17
    18
    19
    20
    21
    22
    23
    24
    25
    import numpy as np
    import scipy
    import scipy.signal as sigs
    import matplotlib.pyplot as plt


    img = scipy.misc.imread("mygo1.jpg", mode="L")

    # Define the Sobel operator kernels.
    kernel_x = np.array([ [-1, 0, 1],[-2, 0, 2],[-1, 0, 1] ])
    kernel_y = np.array([ [1, 2, 1], [0, 0, 0], [-1, -2, -1] ])

    G_x = sig.convolve2d(img, kernel_x, mode='same')
    G_y = sig.convolve2d(img, kernel_y, mode='same')

    # Plot
    fig = plt.figure()
    ax1 = fig.add_subplot(121)
    ax2 = fig.add_subplot(122)

    # the transformation (G_x + 255) / 2.
    ax1.imshow((G_x + 255) / 2, cmap='gray'); ax1.set_xlabel("Gx")
    ax2.imshow((G_y + 255) / 2, cmap='gray'); ax2.set_xlabel("Gy")
    plt.show()

    The result shows the comparation of using and .

    gradient

Image Segmentation

Felzenszwalb’s Algorithm was proposed for segmenting an image into similar regions. Each pixel is a vertex and then gradually merged to create a region, and the connection between each pixel is a minimum spanning trss (MST).

  • How to Balance Difference bwtween two Pixels
    Difinations:

    • Internal Difference: , which represents the edge with the greatest dissimilarity in MST.
    • Difference between two components:
      , which represents the dissimilarity of the edge that connects all the edges of the two regions, the dissimilarity of the edge with the least dissimilarity. The dissimilarity of the two regions where they are most similar.

    The standard for merging two regions is:

    Only when and are able to stand the , they will be segmented into different regions. Otherwise, they are regarded as in the same region.

    • Procedures of the Algorithm
      Given , and .
      1. edges are sorted by dissimilarity (non-desconding), labeled as ,
      2. choose ,
      3. determines the currently selected edges for merging if meets:
        1)
        2) the degree of dissimilarity is not greater than the degree of dissimilarity within the two , then step 4. Otherwise, straight to step 5.
      4. update thresholds and class designators:
        class designators: -> ,
      5. if , select the next edge to go to step 3.
  • Example Code
    Applying skimage segmentation to segment the example image. Set k = 100 and 500 to see how it controlls merge-region size for showing.

    The example image used for segmentation is:
    iceland

    1
    2
    3
    4
    5
    6
    7
    8
    9
    10
    11
    12
    13
    14
    15
    16
    17
    18
    19
    import numpy as np
    import scipy
    import scipy.signal as sig
    import skimage.segmentation
    from matplotlib import pyplot as plt

    img2 = scipy.misc.imread("iceland.jpg", mode="L")
    segment_mask1 = skimage.segmentation.felzenszwalb(img2, scale=100)
    segment_mask2 = skimage.segmentation.felzenszwalb(img2, scale=1000)

    fig = plt.figure(figsize=(12, 5))
    ax1 = fig.add_subplot(121)
    ax2 = fig.add_subplot(122)
    ax1.imshow(segment_mask1); ax1.set_xlabel("k=100")
    ax2.imshow(segment_mask2); ax2.set_xlabel("k=500")
    fig.suptitle("Felsenszwalb's efficient graph based image segmentation")
    plt.tight_layout()
    plt.show()

    Segment results (k = 100 & k = 500):
    seg

    Image Classification

  • CNN for Image Classification
    Convolution operation: As we learned from the course, in short, convolution applies element-wise multiplication for the vector/ matrix and then
    summation.

  • VGG (Visual Geometry Group)

    Using 3*3 convoluton layer and 2*2 pooling layer. VGG has two structures, namely VGG16 and VGG19, and there is no essential difference between the two, but the network depth is different.

    Why small size works better: each convolutional layer passes through an activation function. The activation function is a nonlinear transformation. The ability to be non-linear is stronger.

  • Example Code

    Here I use VGG16 to implement a simple classficatoin for animals. The npy file and a class file for choosing results were downloaded from here.

    VGG16 contains 16 hidden layers (13 convolutional layers and 3 fully connected layers).

    The code for test is from here. I downloaded 3 images from google for test. Minor changed code for classifiication:

Click ME to Show Code


1
2
3
4
5
6
7
8
9
10
11
12
13
14
15
16
17
18
19
20
21
22
23
24
25
26
27
28
29
30
31
32
33
34
35
36
37
38
39
40
41
42
43
44
45
46
47
48
49
50
51
52
53
54
55
56
57
58
59
60
61
62
63
64
65
66
67
68
69
70
71
72
73
74
75
76
77
78
79
80
81
82
83
84
85
86
87
88
89
90
91
92
93
94
95
96
97
98
99
100
101
102
103
104
105
106
107
108
109
110
111
112
113
114
115
116
117
118
119
120
121
122
123
124
125
126
127
128
129
130
131
132
133
134
135
136
137
138
139
140
141
142
143
144
145
146
147
148
149
150
151
152
153
154
155
156
157
158
159
160
161
162
163
164
165
166
167
168
169
170
171
172
173
174
175
176
177
178
179
180
181
182
183
184
185
186
187
188
189
190
191
192
193
194
195
196
197
198
199
200
201
202
203
204
205
206
207
208
209
210
211
212
213
214
215
216
217
218
219
220
221
222
223
224
225
226
227
228
229
230
231
232
233
234
235
236
237
238
239
240
241
import numpy as np
import tensorflow.compat.v1 as tf
tf.disable_v2_behavior()
from scipy.misc import imread, imresize, toimage
import matplotlib.pyplot as plt
import skimage
import skimage.io
import skimage.transform
from imageClass import class_names

VGG_MEAN = [103.939, 116.779, 123.68]


class VGG16(object):
"""
The VGG16 model for image classification
"""

def __init__(self, vgg16_npy_path=None, trainable=True):
"""
:param vgg16_npy_path: string, vgg16_npz path
:param trainable: bool, construct a trainable model if True
"""
# The pretained data
if vgg16_npy_path is None:
self._data_dict = None
else:
self._data_dict = np.load(vgg16_npy_path, encoding="latin1", allow_pickle= True).item()
self.trainable = trainable
# Keep all trainable parameters
self._var_dict = {}
self.__bulid__()

def __bulid__(self):
"""
The inner method to build VGG16 model
"""
# input and output
self._x = tf.placeholder(tf.float32, shape=[None, 224, 224, 3])
self._y = tf.placeholder(tf.int64, shape=[None, ])
# Data preprocessiing
mean = tf.constant([103.939, 116.779, 123.68], dtype=tf.float32, shape=[1, 1, 1, 3])
x = self._x - mean
self._train_mode = tf.placeholder(tf.bool) # use training model is True, otherwise test model
# construct model
conv1_1 = self._conv_layer(x, 3, 64, "conv1_1")
conv1_2 = self._conv_layer(conv1_1, 64, 64, "conv1_2")
pool1 = self._max_pool(conv1_2, "pool1")

conv2_1 = self._conv_layer(pool1, 64, 128, "conv2_1")
conv2_2 = self._conv_layer(conv2_1, 128, 128, "conv2_2")
pool2 = self._max_pool(conv2_2, "pool2")

conv3_1 = self._conv_layer(pool2, 128, 256, "conv3_1")
conv3_2 = self._conv_layer(conv3_1, 256, 256, "conv3_2")
conv3_3 = self._conv_layer(conv3_2, 256, 256, "conv3_3")
pool3 = self._max_pool(conv3_3, "pool3")

conv4_1 = self._conv_layer(pool3, 256, 512, "conv4_1")
conv4_2 = self._conv_layer(conv4_1, 512, 512, "conv4_2")
conv4_3 = self._conv_layer(conv4_2, 512, 512, "conv4_3")
pool4 = self._max_pool(conv4_3, "pool4")

conv5_1 = self._conv_layer(pool4, 512, 512, "conv5_1")
conv5_2 = self._conv_layer(conv5_1, 512, 512, "conv5_2")
conv5_3 = self._conv_layer(conv5_2, 512, 512, "conv5_3")
pool5 = self._max_pool(conv5_3, "pool5")

# n_in = ((224 / (2**5)) ** 2) * 512
fc6 = self._fc_layer(pool5, 25088, 4096, "fc6", act=tf.nn.relu, reshaped=False)
# Use train_mode to control
fc6 = tf.cond(self._train_mode, lambda: tf.nn.dropout(fc6, 0.5), lambda: fc6)
fc7 = self._fc_layer(fc6, 4096, 4096, "fc7", act=tf.nn.relu)
fc7 = tf.cond(self._train_mode, lambda: tf.nn.dropout(fc7, 0.5), lambda: fc7)
fc8 = self._fc_layer(fc7, 4096, 1000, "fc8", act=tf.identity)

self._prob = tf.nn.softmax(fc8, name="prob")

if self.trainable:
self._cost = tf.reduce_mean(tf.nn.sparse_softmax_cross_entropy_with_logits(fc8, self._y))
correct_pred = tf.equal(self._y, tf.argmax(self._prob, 1))
self._accuracy = tf.reduce_mean(tf.cast(correct_pred, tf.float32))
else:
self._cost = None
self._accuracy = None

def _conv_layer(self, inpt, in_channels, out_channels, name):
"""
Create conv layer
"""
with tf.variable_scope(name):
filters, biases = self._get_conv_var(3, in_channels, out_channels, name)
conv_output = tf.nn.conv2d(inpt, filters, strides=[1, 1, 1, 1], padding="SAME")
conv_output = tf.nn.bias_add(conv_output, biases)
conv_output = tf.nn.relu(conv_output)
return conv_output

def _fc_layer(self, inpt, n_in, n_out, name, act=tf.nn.relu, reshaped=True):
"""Create fully connected layer"""
if not reshaped:
inpt = tf.reshape(inpt, shape=[-1, n_in])
with tf.variable_scope(name):
weights, biases = self._get_fc_var(n_in, n_out, name)
output = tf.matmul(inpt, weights) + biases
return act(output)

def _avg_pool(self, inpt, name):
return tf.nn.avg_pool(inpt, ksize=[1, 2, 2, 1], strides=[1, 2, 2, 1], padding="SAME",
name=name)

def _max_pool(self, inpt, name):
return tf.nn.max_pool(inpt, ksize=[1, 2, 2, 1], strides=[1, 2, 2, 1], padding="SAME",
name=name)

def _get_fc_var(self, n_in, n_out, name):
"""Get the weights and biases of fully connected layer"""
if self.trainable:
init_weights = tf.truncated_normal([n_in, n_out], 0.0, 0.001)
init_biases = tf.truncated_normal([n_out, ], 0.0, 0.001)
else:
init_weights = None
init_biases = None
weights = self._get_var(init_weights, name, 0, name + "_weights")
biases = self._get_var(init_biases, name, 1, name + "_biases")
return weights, biases

def _get_conv_var(self, filter_size, in_channels, out_channels, name):
"""
Get the filter and bias of conv layer
"""
if self.trainable:
initial_value_filter = tf.truncated_normal([filter_size, filter_size, in_channels, out_channels], 0.0,
0.001)
initial_value_bias = tf.truncated_normal([out_channels, ], 0.0, 0.001)
else:
initial_value_filter = None
initial_value_bias = None
filters = self._get_var(initial_value_filter, name, 0, name + "_filters")
biases = self._get_var(initial_value_bias, name, 1, name + "_biases")
return filters, biases

def _get_var(self, initial_value, name, idx, var_name):
"""
Use this method to construct variable parameters
"""
if self._data_dict is not None:
value = self._data_dict[name][idx]
else:
value = initial_value

if self.trainable:
var = tf.Variable(value, dtype=tf.float32, name=var_name)
else:
var = tf.constant(value, dtype=tf.float32, name="var_name")
# Save
self._var_dict[(name, idx)] = var
return var

def get_train_op(self, lr=0.01):
if not self.trainable:
return
return tf.train.GradientDescentOptimizer(lr).minimize(self.cost,
var_list=list(self._var_dict.values()))

@property
def input(self):
return self._x

@property
def target(self):
return self._y

@property
def train_mode(self):
return self._train_mode

@property
def accuracy(self):
return self._accuracy

@property
def cost(self):
return self._cost

@property
def prob(self):
return self._prob


# returns image of shape [224, 224, 3]
# [height, width, depth]
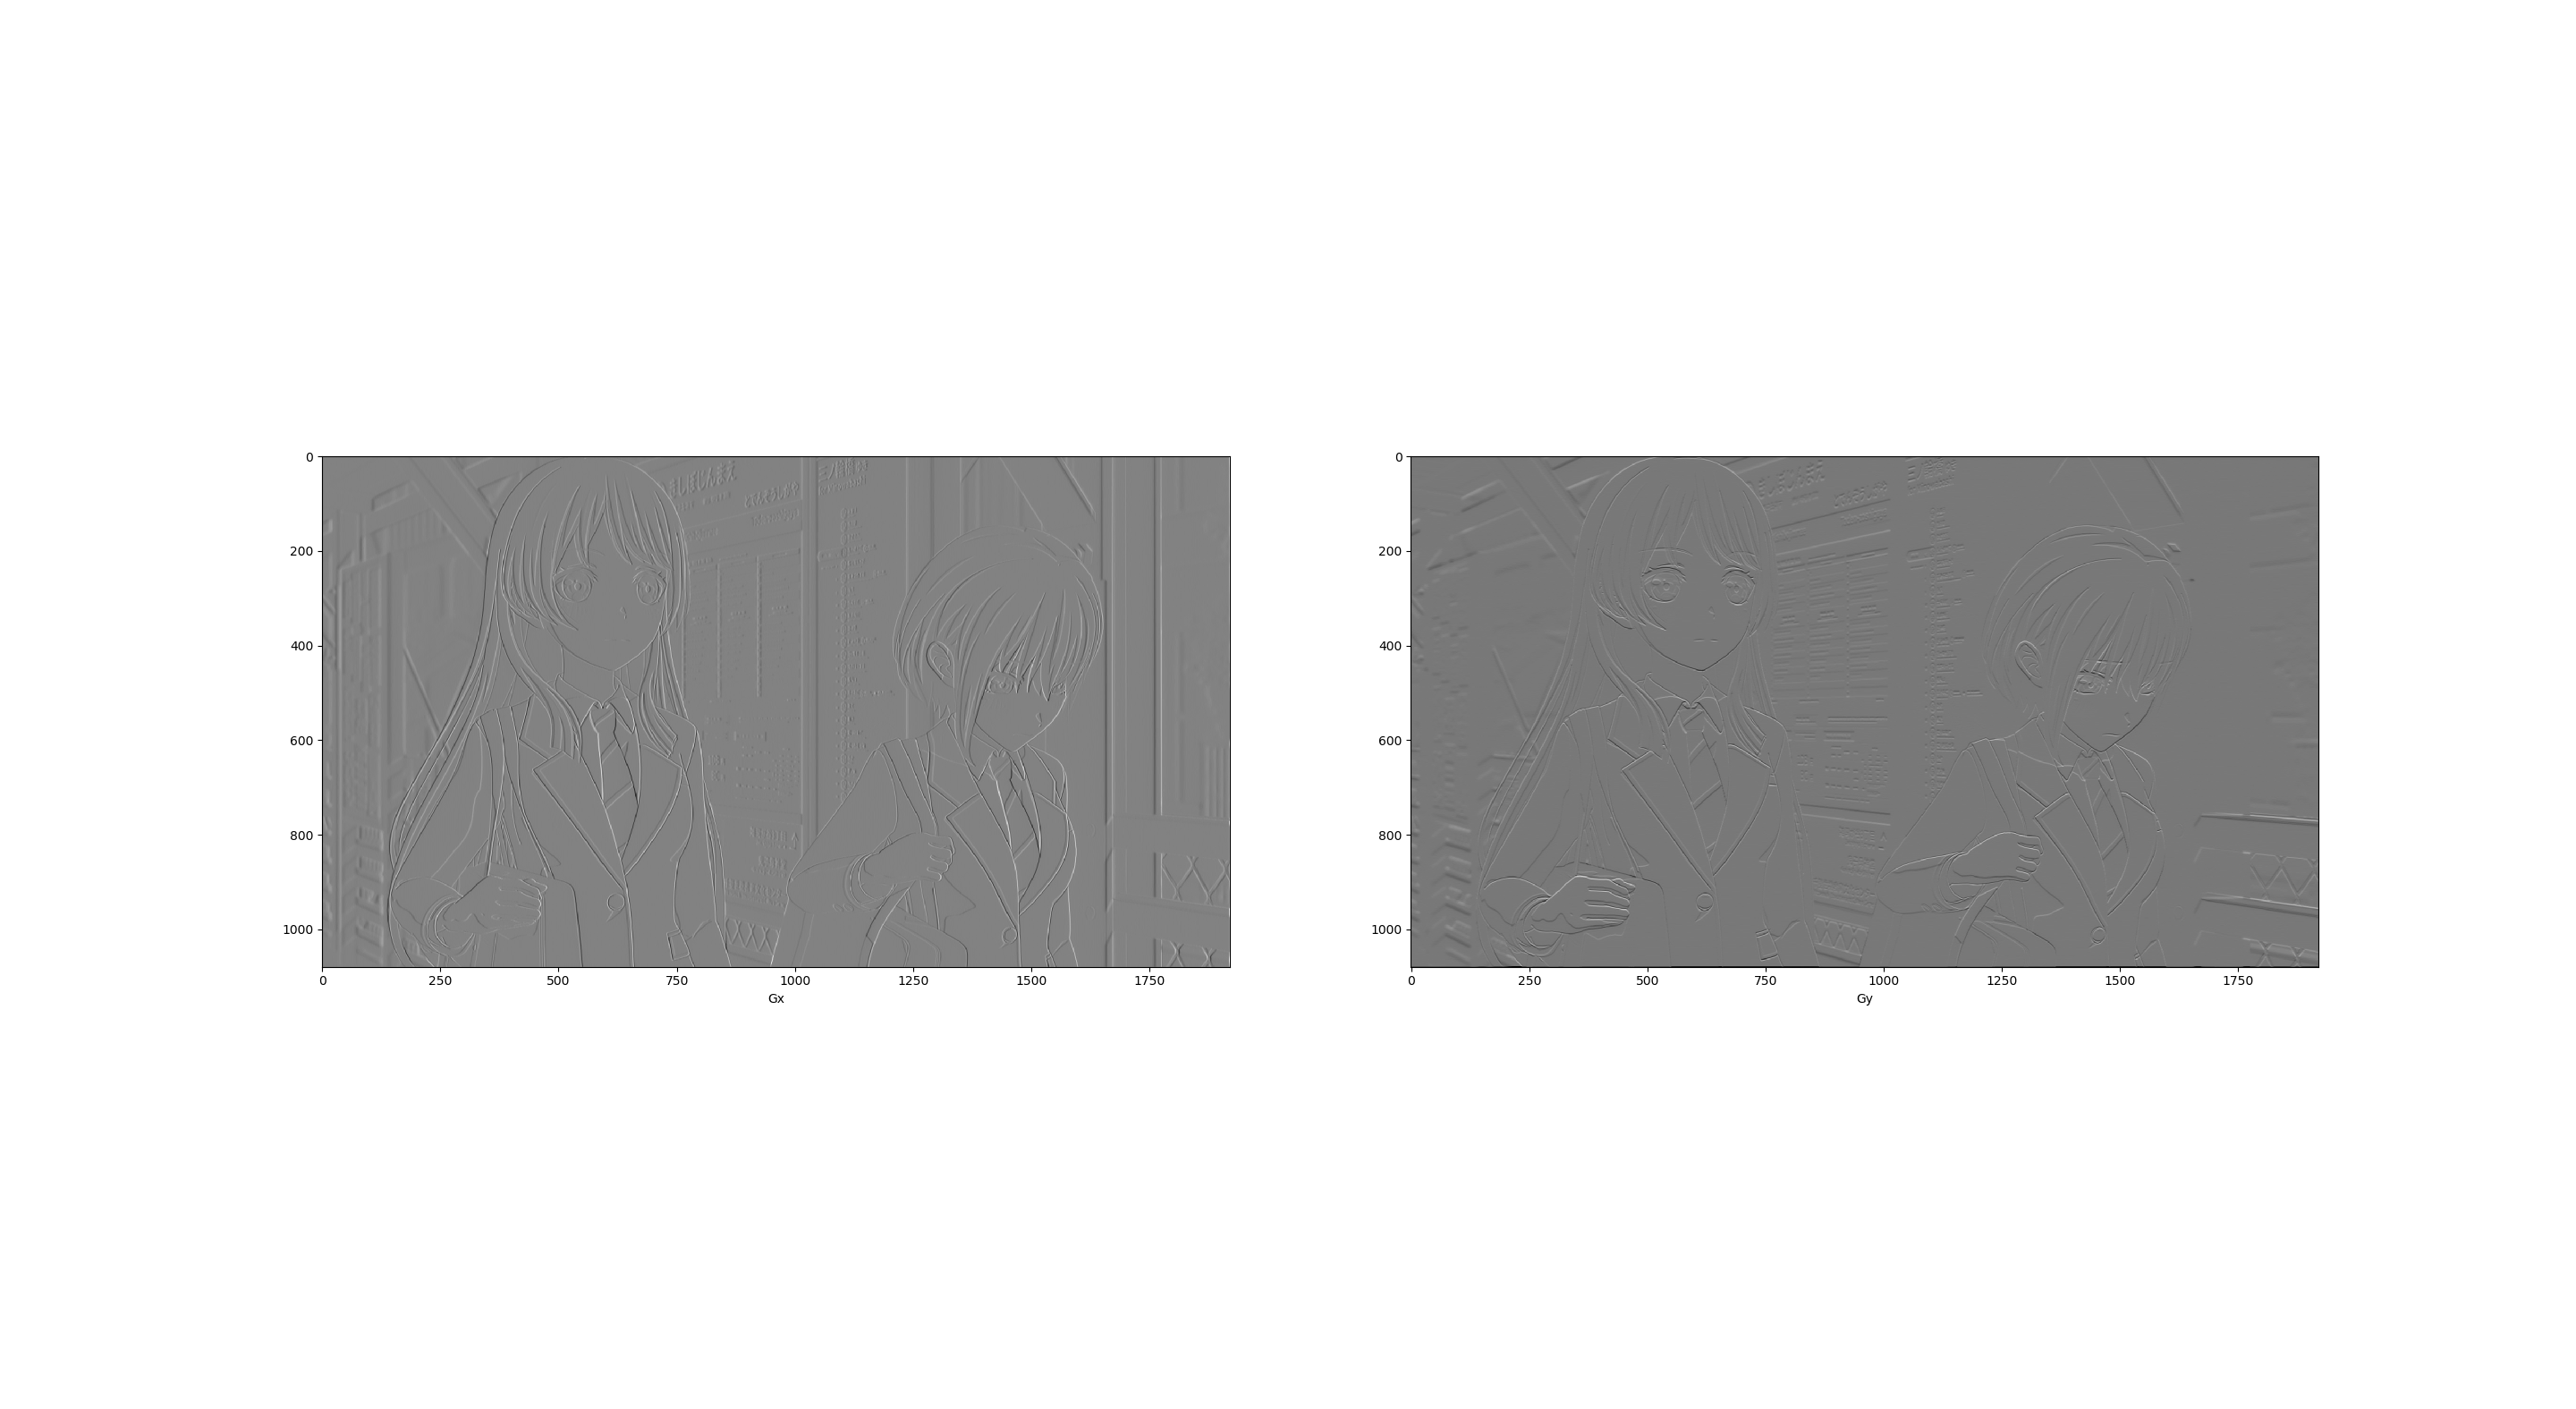
def load_image(path):
# load image
img = skimage.io.imread(path)
img = img / 255.0
# assert (0 <= img).all() and (img <= 1.0).all()
# print "Original Image Shape: ", img.shape
# we crop image from center
short_edge = min(img.shape[:2])
yy = int((img.shape[0] - short_edge) / 2)
xx = int((img.shape[1] - short_edge) / 2)
crop_img = img[yy: yy + short_edge, xx: xx + short_edge]
# resize to 224, 224
resized_img = skimage.transform.resize(crop_img, (224, 224))
return resized_img


def test_not_trainable_vgg16():
path = "D:/PyCharm Community Edition 2024.1.3/TechBlog"
img1 = load_image(path + "/puppy.jpg") * 255.0
batch1 = img1.reshape((1, 224, 224, 3))

tf.compat.v1.disable_eager_execution()
with tf.Graph().as_default(), tf.compat.v1.Session() as sess:
vgg = VGG16(path + "/vgg16.npy", trainable=False)
probs = sess.run(vgg.prob, feed_dict={vgg.input: batch1, vgg.train_mode: False})
for i, prob in enumerate([probs[0]]):
preds = (np.argsort(prob)[::-1])[0:5]
print("The" + str(i + 1) + " image:")
for p in preds:
print("\t", p, class_names[p], prob[p])


if __name__ == "__main__":
path = "D:/PyCharm Community Edition 2024.1.3/TechBlog"
img1 = load_image(path + "/puppy.jpg") * 255.0
batch1 = img1.reshape((1, 224, 224, 3))
x = np.concatenate((batch1), 0)
y = np.array([292, 611], dtype=np.int64)
with tf.Graph().as_default():
with tf.Session() as sess:
vgg = VGG16(path + "/vgg16.npy", trainable=True)
sess.run(tf.global_variables_initializer())

train_op = vgg.get_train_op(lr=0.0001)
_, cost = sess.run([train_op, vgg.cost], feed_dict={vgg.input: x,
vgg.target: y, vgg.train_mode: True})
accuracy = sess.run(vgg.accuracy, feed_dict={vgg.input: x,
vgg.target: y, vgg.train_mode: False})
print(cost, accuracy)

Example images for VGG16:

  1. Puppy

    puppy
    vgg1
    The results generated by VGG16 for the puppy was a “Japanese spaniel“.

  2. Cat

    cat
    res2
    The results generated by VGG16 for this cat was a “Egyptian cat“.

  3. Saber

    saber
    res3
    Sadly, it only implements object detection known in the class file to the image instead of recognition of Saber. To make it successful, dataset for her needs to be collected for training.

1
In the next Blog, I intend to apply YOLO for image classification, from training dataset to realize the image recognition. Hopefully, Saber will be recognized :).

Reference

[1] Gradient Vector

[2] Pedro F. Felzenszwalb, and Daniel P. Huttenlocher. “Efficient graph-based image segmentation.” Intl. journal of computer vision 59.2 (2004): 167-181.article

[3] 图像分割—基于图的图像分割 blog address

[4] Simonyan, K. (2014). Very deep convolutional networks for large-scale image recognition. arXiv preprint arXiv:1409.1556.

[5] VGG in TensorFlow

0%